
How to Make a Sugar Cookie Gingerbread House (Recipe and Template included)

Sugar Cookie Pink Gingerbread House
Tips for making the perfect Sugar Cookie Gingerbread House - Level: Pretty Easy
Want a gingerbread house that’s cute, sweet, and actually easy to build? This sugar-cookie gingerbread house is one of my favorite holiday traditions — simple to make, sturdy enough for decorating, and perfect for kids or beginners. In this guide, I’ll share the full recipe, step-by-step instructions, the exact tools I use, my best decorating tips, and troubleshooting tricks so your house comes out picture-perfect every time.
Whether you're hosting a Christmas cookie party or creating a cozy holiday moment at home, this sugar cookie gingerbread house is a festive project that everyone will love.
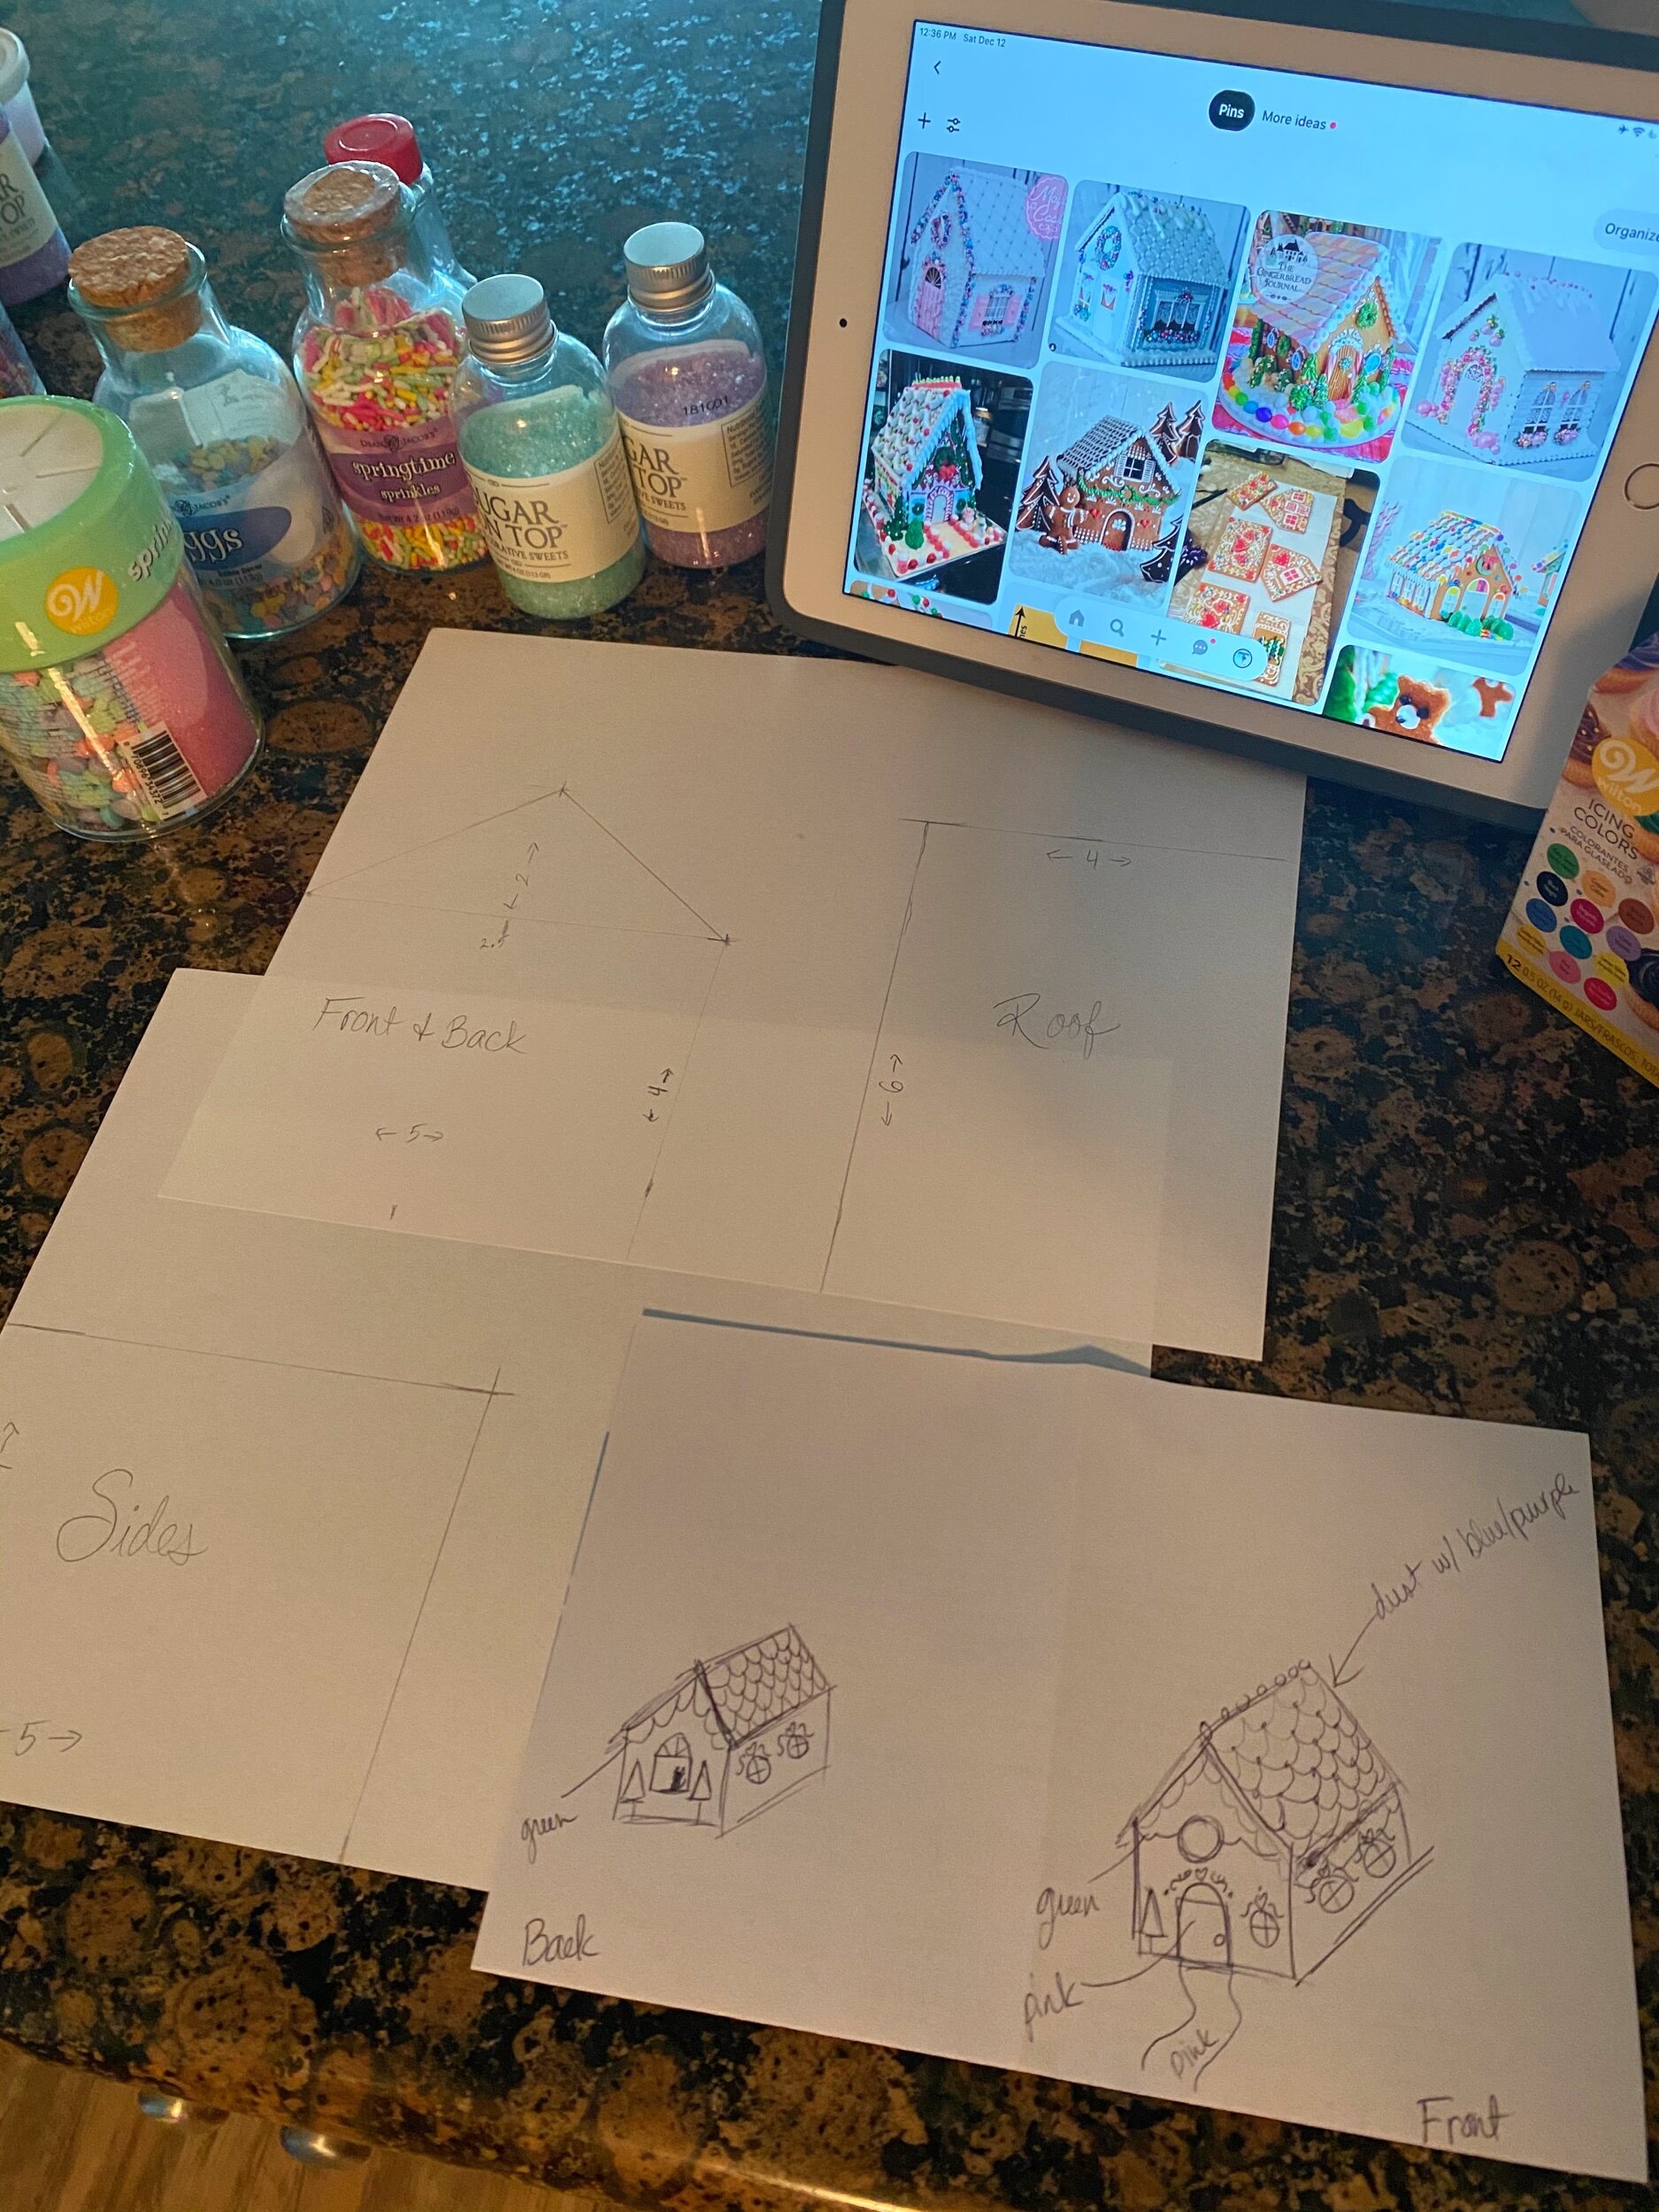
I wouldn’t call myself a baker, though I love to make cookies and cupcakes. My best friend, and realtor: Holly Patterson, had her annual Christmas Gingerbread House Contest and when I saw her post, I thought, “I wish I liked Gingerbread.” To go through all the trouble to make something I didn’t like seemed silly. That’s when I started the research. I can’t be the only one, someone must’ve tried this before! I found fancy houses and then I found Studio DIY. First off, I follow Kelly on Instagram and was inspired after reading her post. I went down a long rabbit hole of research and I was pretty pleased with the results! I was looking at recipes and ways to avoid going out to buy cream of tartar or molasses, things I never use. The good news, I didn’t have to go anywhere and had everything I needed in my pantry (my huge sprinkle collection finally came in handy)!
I didn’t even know where to begin, and started asking things like: how do you make the house shapes? Do you put the frosting on before or after you construct the gingerbread house? What design should I do? I then did what I do best, I made a Pinterest Gingerbread House Ideas board to collect my thoughts and inspiration. After I had my gameplan, I was ready to start!
Note: I keep calling it a Gingerbread house because you can use the template for a Sugar Cookie House or a Gingerbread House.
Looking for more sugar cookie house ideas beyond Christmas?
See our complete Sugar Cookie House Guide for easy builds, kid-friendly designs, and creative ideas for more holidays including Valentine’s Day, a Leprechaun Trap, a Bunny Cottage, Snoopy’s Dog House and more.
Get your FREE Printable Gingerbread House Template - CLICK HERE
Gingerbread House Template and Plan

Checkout fun children gifts like this cute fire station!

CHeck out our toy wishlist!
Looking for great Toddler gifts? Check out what my kiddos have on their wishlist for Christmas this year! Amazon WISHLIST LINK
Shop this Post:
Shop our favorite sugar cookie decorating tools and supplies on Amazon → My Favorite Baking Supplies List
Stand Mixer
Silicone Baking Mats
Cooling Racks
Rolling Pin
Parchment Paper Sheets
Cookie Cutter Set
Piping Bags + Tips
Edible Glitter Decorations
Holiday Sprinkles
Icing Scraper
Food Coloring Gel Pack
Gingerbread House Display Board
LED Fairylights (fun lights outside or inside!)
Gingerbread Sugar Cookie House Recipe
Plan ahead! I did a sketch and made my own template based on other templates I saw. I was worried the sugar cookie would be a little crumbly, so I made a smaller house by taking an inch off of every measurement in this Gingerbread House blueprint template. I followed the recipe from Better Homes & Gardens but tweaked it a little:
Prep Time: 30 minutes
Chill Time: 1 hour
Bake Time: 12–15 minutes
Total Time: ~2 hours
Yield: 1 Valentine’s Day sugar cookie house
Ingredients
2 cups butter, softened
1 1/4 cup sugar
2 tablespoons milk
2 teaspoons vanilla extract (I love Vanillas of the World)
4 ½ cups all-purpose flour
3/4 cup rainbow sprinkles
1 – 2 cup buttercream icing (see recipe in next section below)

Use a pizza cutter for those edges!
Directions - Sugar Cookie Dough That Holds Its Shape
Step 1 - Preheat oven to 325F.
Step 2 - In a large mixing bowl beat butter with an electric mixer on medium to high speed for 30 seconds. Add sugar; beat until combined, scraping sides of bowl occasionally. Beat in 1 tablespoon milk and 1 teaspoon vanilla at a time (2x each total). Beat in as much of the flour as you can with the mixer. With a wooden spoon (or cute spatula), stir in sprinkles and any remaining flour.
Step 3 - Divide dough in half. Cover and chill about 1 hour or until dough is easy to handle. You can refrigerate the cookie dough for up to 2 days. On large sheets of parchment paper or Silpat mats (less slippery) roll out dough portions to 1/8- to 1/4-inch thick. Lightly flour the top of the dough as necessary to keep it from sticking to the rolling pin. Pro Tip: I lined my cookie sheet with parchment paper so I could cut the excess dough and throw them in the oven!
Step 4 - Using my gingerbread house template, set pattern pieces on the dough; use a sharp knife (or roll a pizza slicer) to cut around each pattern piece. Remove excess dough. Remove pattern pieces; set aside.
Step 5 - Transfer dough cutouts on parchment paper to a large cookie sheet. Bake in the preheated oven for 12 to 15 minutes or until edges are lightly browned. Cool 2 minutes on pan. Remove to wire racks and cool completely. Use a knife (or pizza slicer) to cut edges evenly, if necessary. Use excess to make trees, snowmen, or gingerbread men shapes.
NOTE: Some of my pieces were pretty thick, so when I put them in the oven, I baked more on the 15-20 min side. It might have been too long because the edges were dry and would kinda crumble when I went to cut them evenly.
Step 6 - Decorate as desired with buttercream icing (see recipe below), candies, and decorative sprinkles. Refrigerate for 20 mins. Assemble cookie house, using buttercream icing as glue. Let stand until firm.

Cut the pieces to the size of the template.

The Trucks that Saved Christmas written by yours truly! The Trucks that Saved Christmas
I wrote a children’s book! My favorite thing to do is read with my boys. I love watching their faces light up as they laugh at a funny moment or learn a good life lesson along the way.
We read a lot of truck books around here — and my favorites are always the Christmas ones, of course! 🚒🎄
This year, I felt inspired to create one of our own. I’m beyond excited to share that I’ve written and published The Trucks that Saved Christmas, now available on Amazon! Also available on Barnes and Noble, Walmart, IngramSpark, and other retailers!
It’s a rhyming, heartwarming story about teamwork, friendship, and helping Santa when he needs it most — perfect for little readers who love trucks and holiday magic.
If you have a truck-loving kid (or know someone who does), I’d be so grateful if you checked it out, shared it, or added it to your holiday reading list.
🎁✨ Thank you for being so sweet and supporting this little Christmas dream of mine!
See more about The Trucks that Saved Christmas and other books on our Bookshelf page!
Best Frosting or Icing for Gingerbread House Construction
Royal Icing vs Buttercream Icing… I read you have to use Royal Icing to make pieces stick together. I love the taste of buttercream frosting so I thought I’d give it a try and use toothpicks if it didn’t work. Guess what, I didn’t need those toothpicks! After a week… it’s still standing!
Ingredients
1 cup unsalted butter, softened
3 teaspoons vanilla extract
4 cups confectioners' sugar, sifted if possible
1-2 tablespoons milk
Divide and add food coloring
Directions
Cream room temperature butter with a hand mixer, the paddle attachment of a stand mixer, or a wooden spoon until smooth and fluffy. Gradually beat in confectioners' sugar until fully incorporated. Beat in vanilla extract.
Pour in milk and beat for an additional 3-4 minutes. Add food coloring, if using, and beat for thirty seconds until smooth or until desired color is reached.
How to Make a Sugar Cookie Gingerbread House
Here’s my advice:
I used my frosting tip kit to help make it look more professional, but you can also cut a small hole in the corner of a plastic bag.
Here are a few icing tips and tricks I have found over the years:
Make sure frosting is not too soft and not too hard. It should have a little peak at the end if you dip a spoon in.
If you are making colors, make sure you set enough aside to use as glue for your house. You can always make white a different color but you can’t go back to white without making more!
After inserting the tip into your piping bag, place it in a pint glass or similar, then open the top of the bag and fold over the top of the glass to get the icing in.
I have a huge sprinkle collection which came in handy! The ManvsSprinkles shop on Amazon has some great options! I found some good sprinkles (especially holiday themed ones) from stores like Target, Home Goods, Ross, or TJ Maxx.
I refrigerated the decorated pieces for 20 mins after I had my design so they were a little more solid and the frosting would set a bit. This gave me time to clean up some of my mess and switch my frosting to a new bag so I could use a different tip for the icing to use as glue for the house assembly.
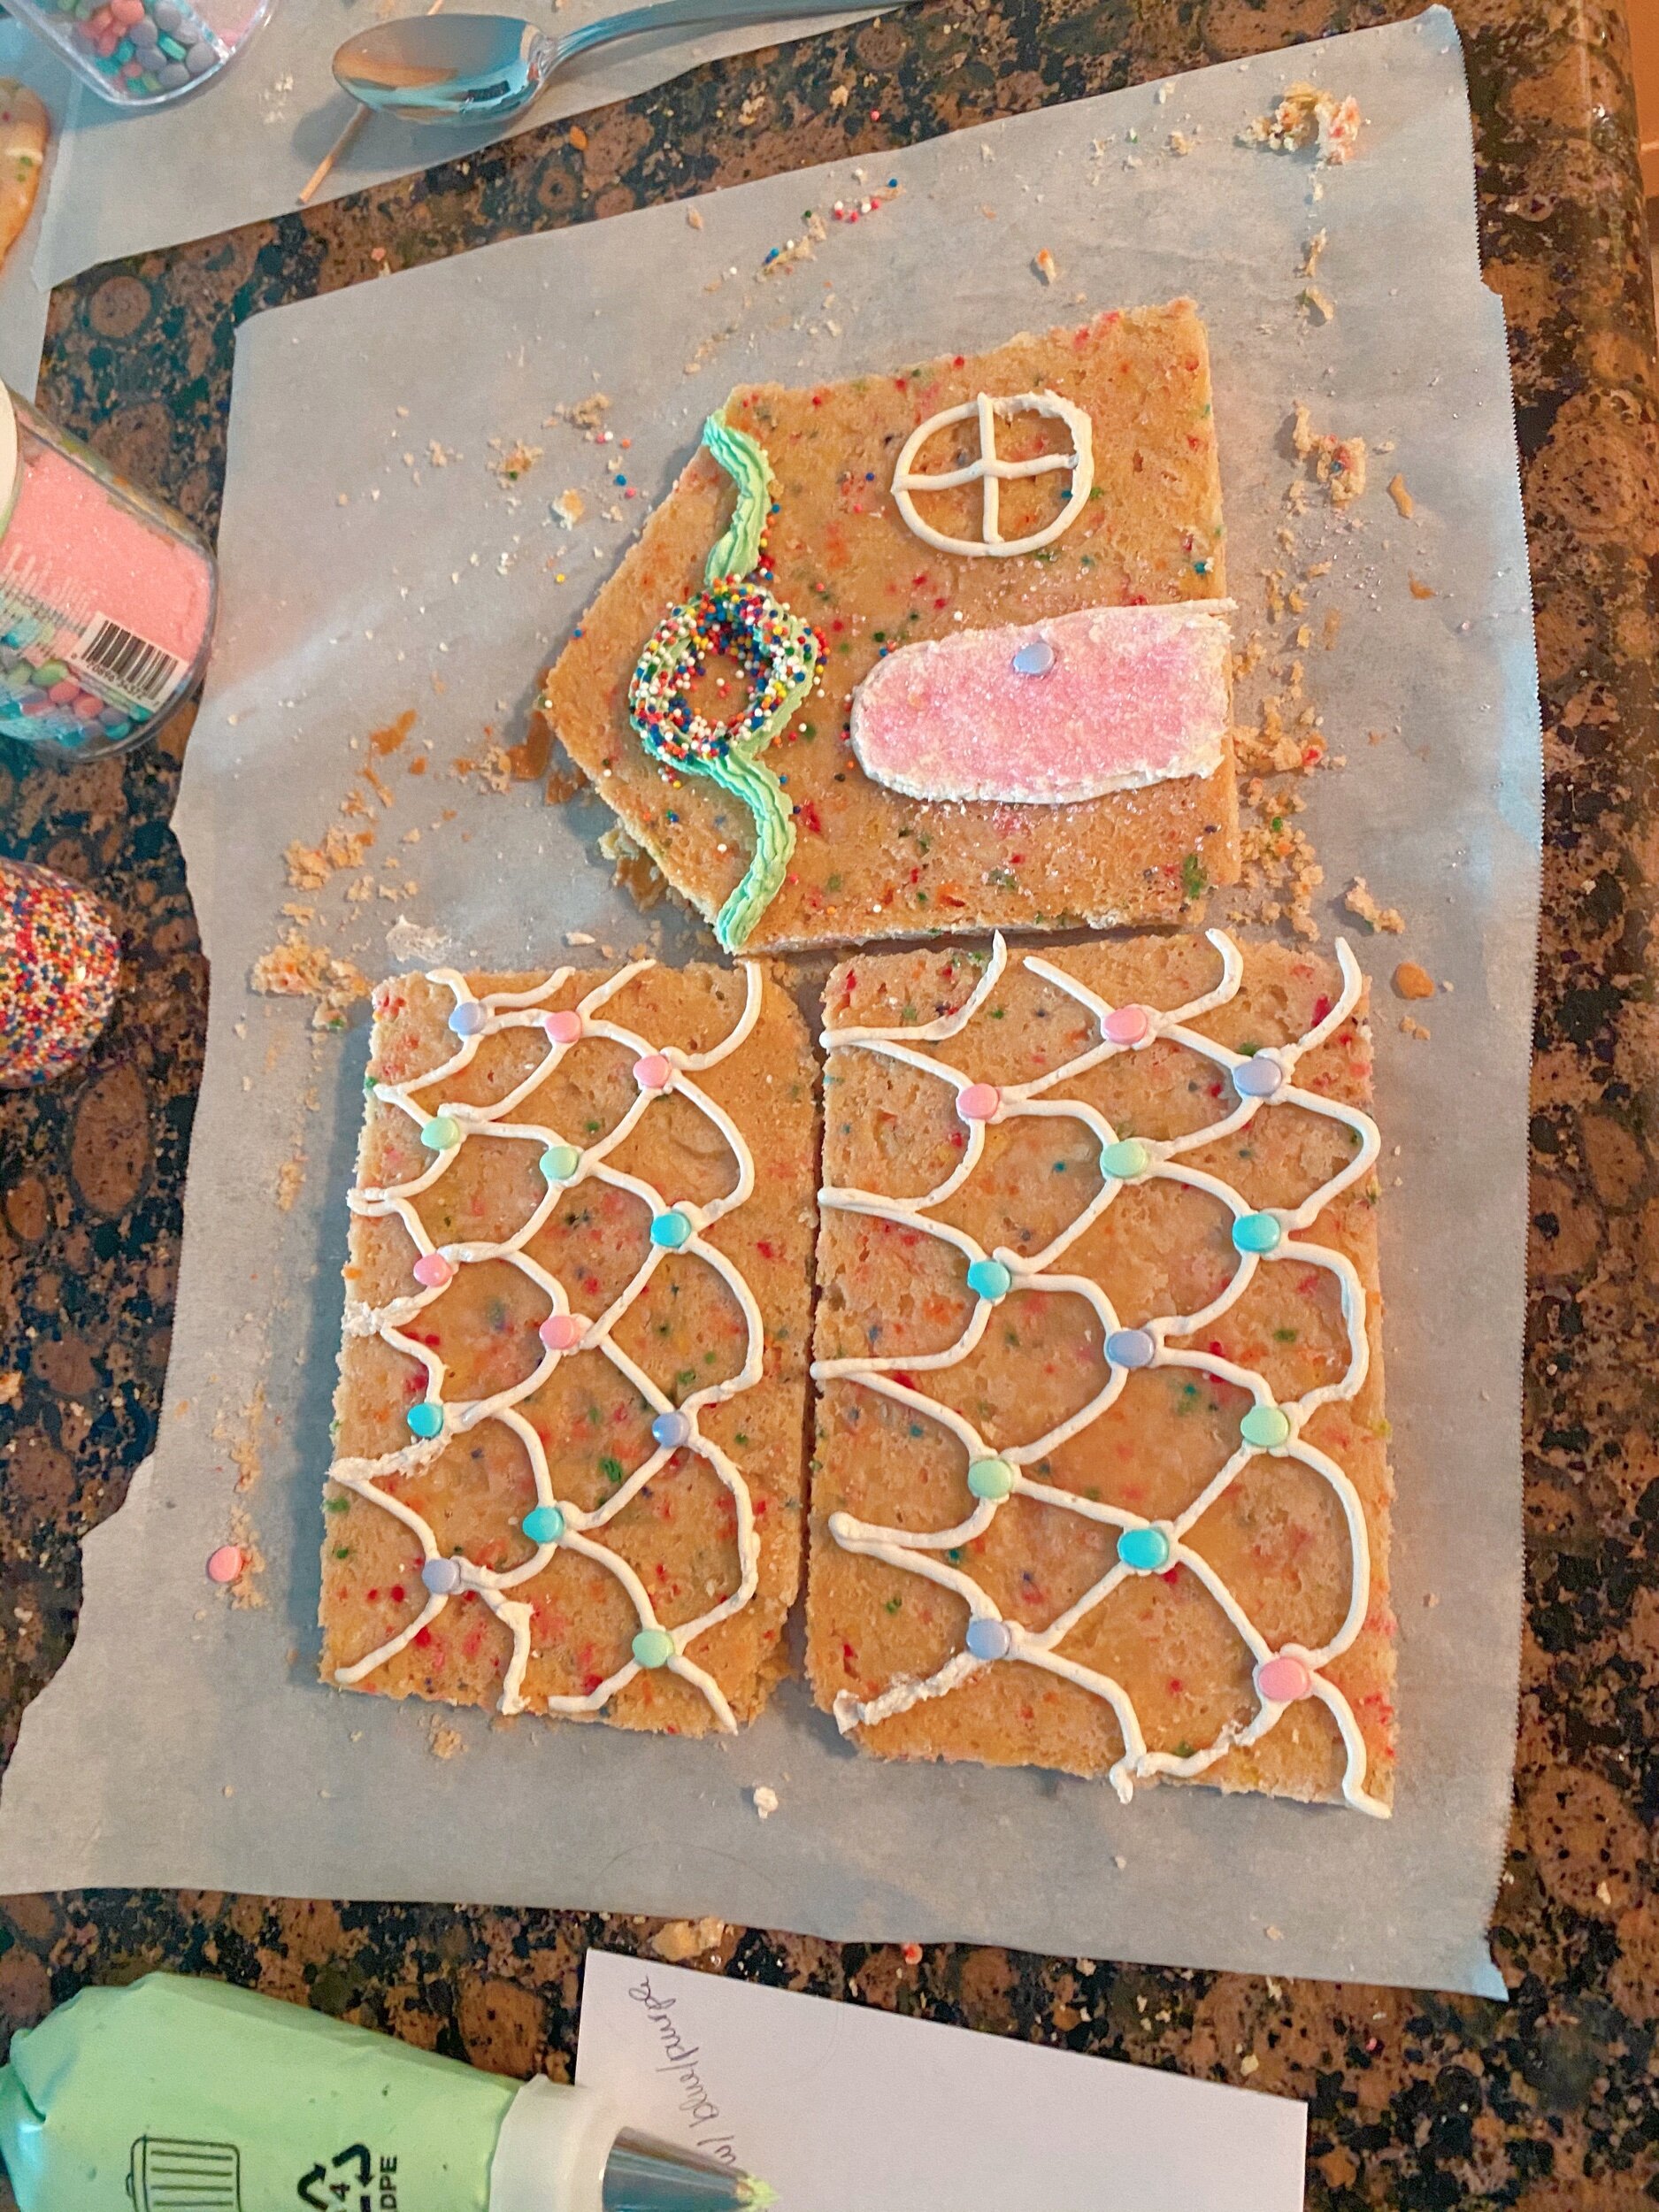
Pro Tip: Put the decorated pieces in the fridge for 20 mins to help the frosting set
Tips for Making a Sturdy Gingerbread House
I used soup cans to lean the pieces against while frosting the edges of my next piece. Once I had two pieces together, it was pretty solid so I was able to put all the pieces together without a side falling over.

Hold the pieces up with soup cans
How to Assemble the House Step by Step
Plan ahead and figure out where your house is going to live (because it is hard to move it)
Put parchment paper down or directly on the plate
Make an Icing base for the front of the house and stick it down. Lean it against the soup can.
Add frosting to the bottom of sides of the house and along the side that will connect to the front.
Carefully and gently push the side into place, do the same with the other side.
Line the bottom and sides of your back with frosting and connect to the house.
Let it set for 10 mins or so before applying the roof.
Smother the top of your house with frosting add one side of the roof and then connect the other. I put frosting in between the peak of the roof too.
I added more frosting to the corners to make it looks more smooth. Pro tip: Don’t use too much frosting on the roof or it will collapse!
And voilà:
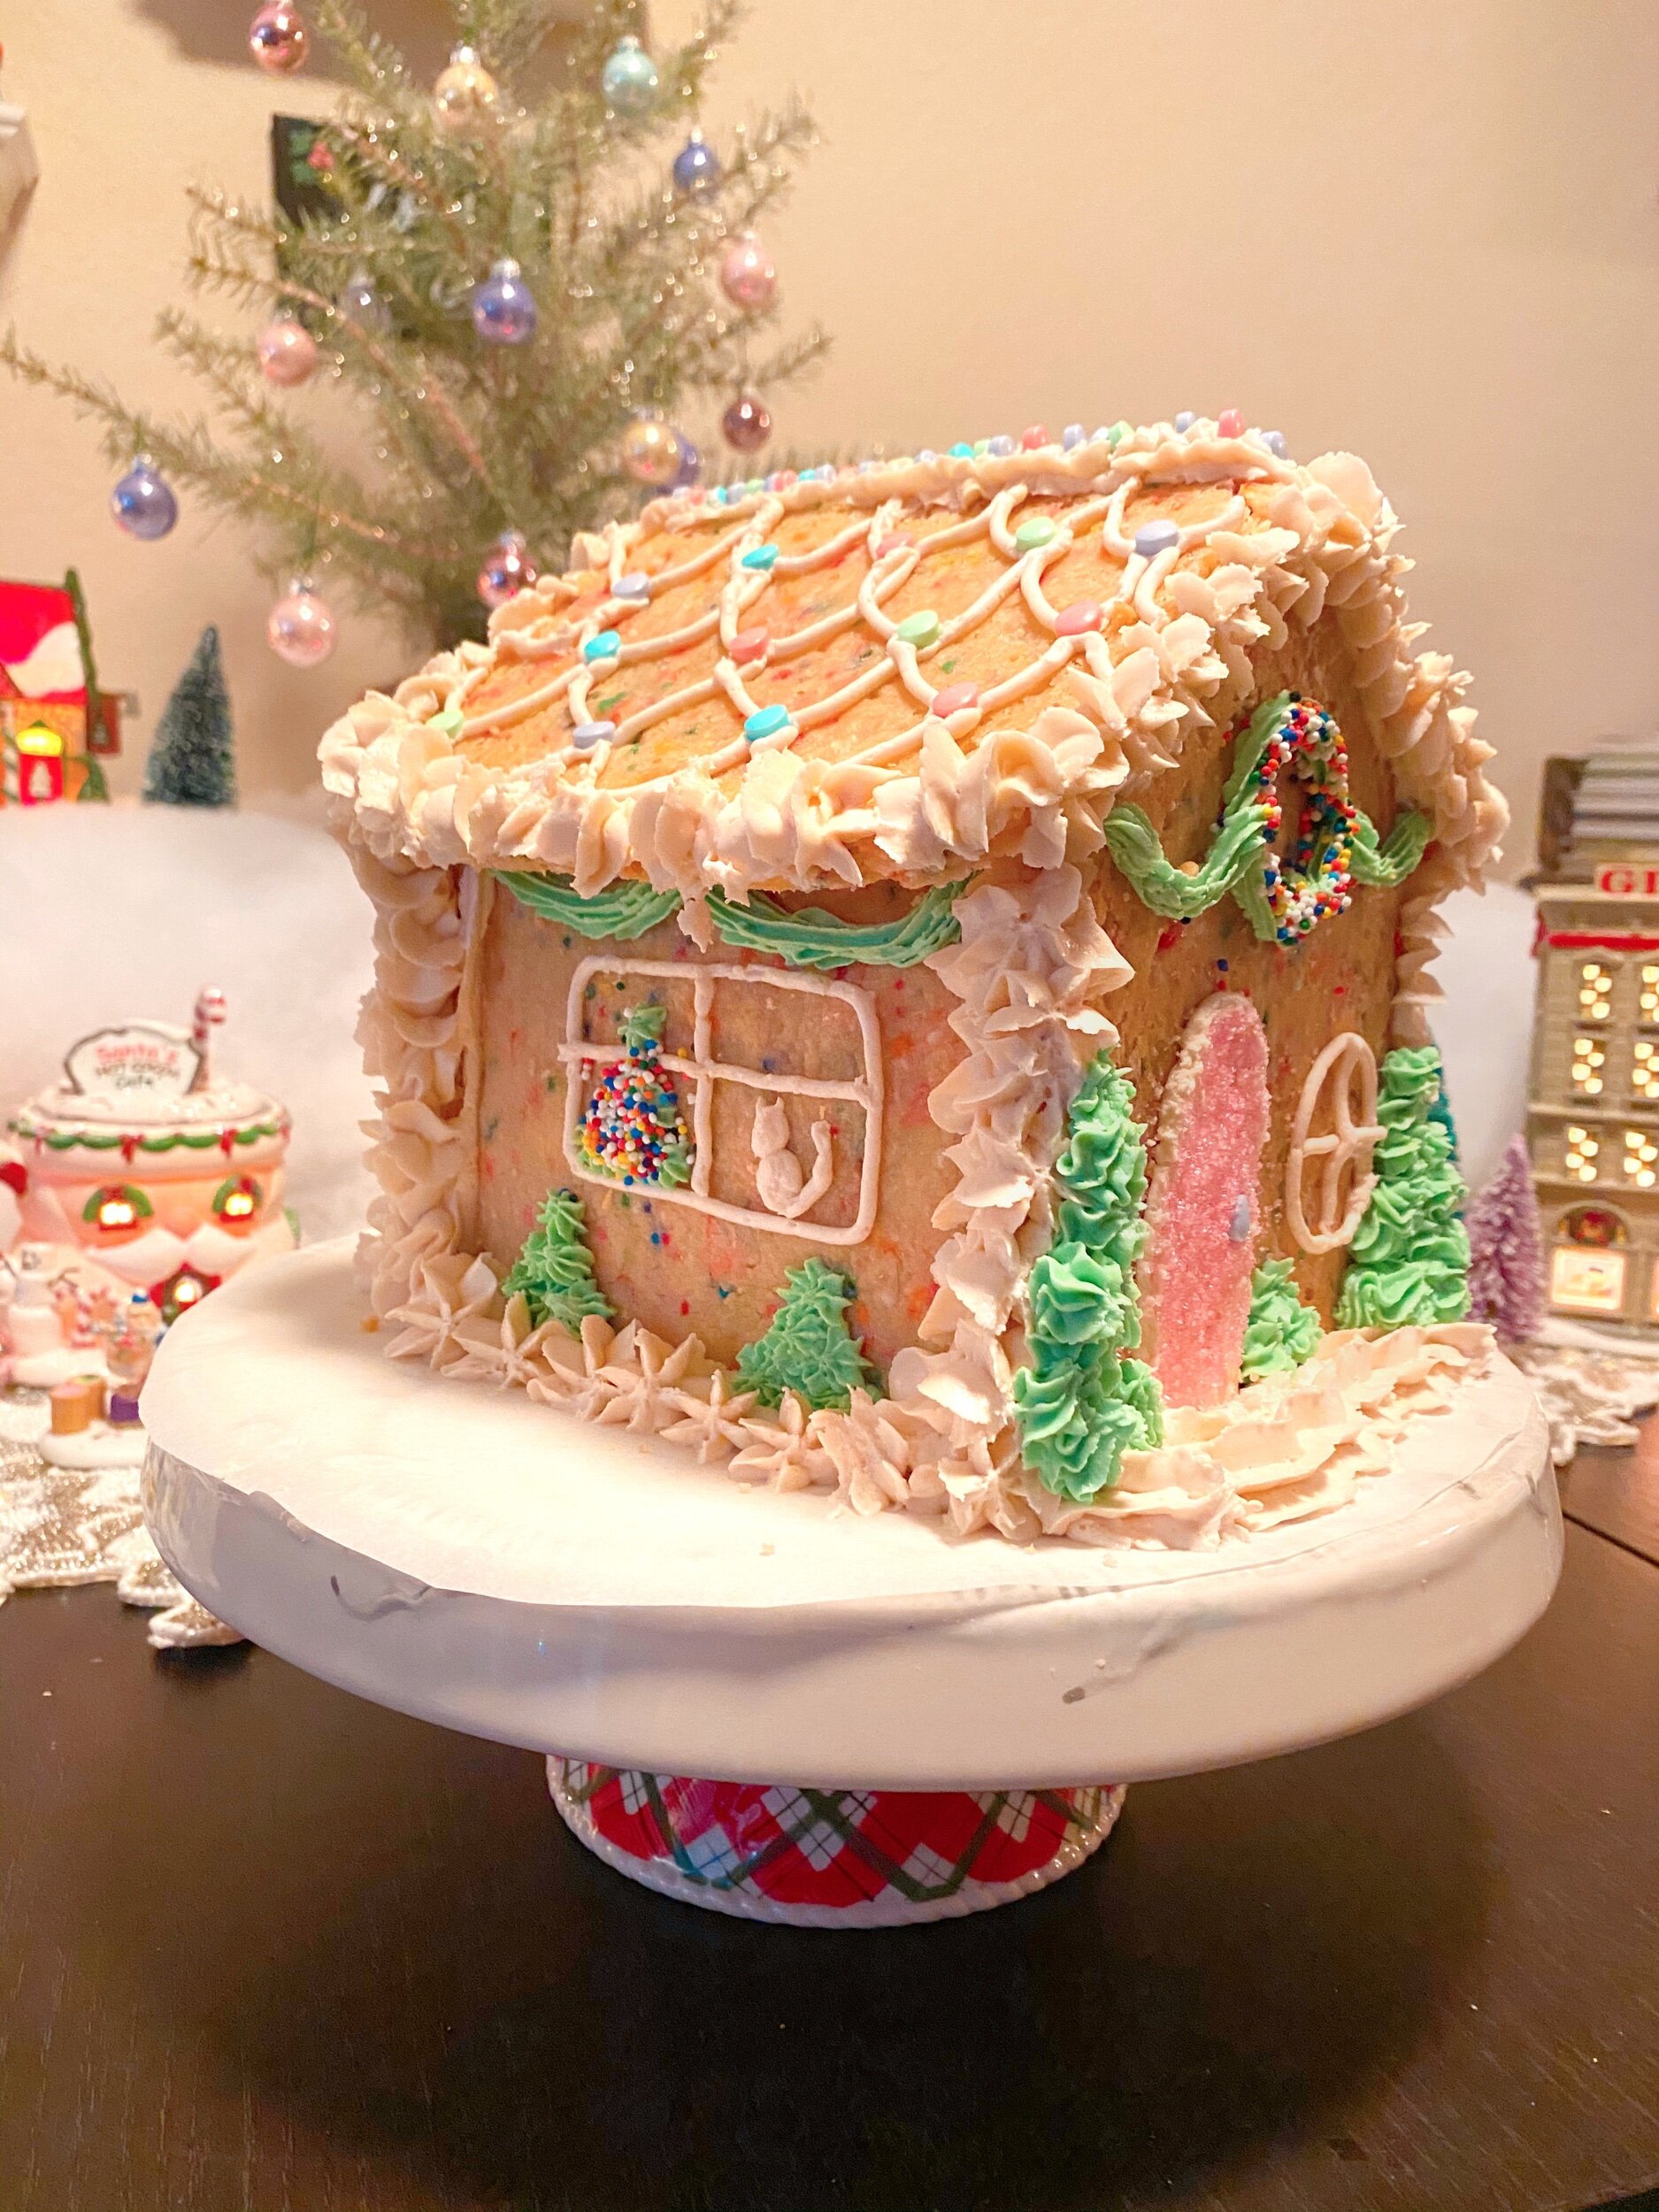
Gingerbread House design idea - cat in the window

Back of Sugar Cookie Gingerbread house
See every angle of the Sugar Cookie Gingerbread house!
FAQ
Why did my gingerbread house collapse?
Usually the icing wasn’t fully dried or the pieces weren’t cut evenly. Make sure edges are straight and let the icing harden for at least 10–15 minutes before adding the roof.
Can I make the dough ahead?
Yes! Refrigerate up to 2 days or freeze up to 1 week.
Does this recipe work with gingerbread instead of sugar cookie dough?
It can, but sugar cookie dough is sturdier and less likely to spread.
How do I make my sugar cookie dough hold its shape?
Chill the dough for 30 minutes before rolling, and freeze the cut pieces for 10 minutes before baking.
What icing works best for building a gingerbread house?
Royal icing or “edible glue” is strongest. Buttercream tends to softens at room temperature but I like it because it tastes better.
How long will a sugar cookie gingerbread house last?
About 5–7 days at room temp, or up to 2 weeks if you’re keeping it for decoration only.
Can I make the pieces ahead?
Yes! Bake the pieces up to 2–3 days in advance and store in an airtight container.
Troubleshooting Your Gingerbread House
My dough cracked while rolling.
It’s too cold—knead slightly until smooth.
The pieces puffed or spread in the oven.
Freeze cut shapes before baking and avoid overmixing.
The roof keeps sliding off.
Add more icing to the top edge and let it dry longer before adding decorations.
My icing is too runny.
Add more powdered sugar 1 tablespoon at a time.
Let me know if you attempt to make this or if you like this post in the comments below!
If you liked this post please share it on your favorite social media site using the Share button below because we’d love to get the word out! Feel free to pin this to your favorite Pinterest board:

More blog posts:


Planning a California coast road trip with kids? After multiple family road trips with our two energetic boys, we’ve discovered the best beaches, playgrounds, hotels, restaurants, and hidden gems from Santa Cruz to San Diego. Whether you’re driving the entire coast or just one section, this guide includes 50+ toddler- and family-friendly stops to help make every mile part of the adventure.